Showing posts with label youtube. Show all posts

Saturday, January 22, 2011

YBF Luscious Lipcolor!

 YBF - for Your Best Friend - Luscious Lipcolor


I received an AWESOME gift... A YBF cosmetics kit! I absolutely love this brand!
These are the lip products from the kit, the colors are supposed to make your lips look fuller. 

Here is the result after applying these cosmetics:

 I definitely feel like the color did exactly what it promised as my lips look much fuller!

Here's what went down...

First, I applied the lipstick:

This is a great nude color! It is slightly warmer in hue than my actual lip color which helps make my lips look fuller! The color is called "Tawny Terrain" as you can see in the image below:


Most people apply lip liner first, I apply mine second (after the lipstick) because I feel like the line is too bold when drawn on first. You can experiment and see which way works best for you! 

Next, I applied the lip liner:

I love this lip liner because it goes on very smooth and feels luxurious. It also has a sharpener built into the cap, which is great because you can throw it in your bag for touch ups and not have to worry about it getting dull. The color is called "Safari Spice" as you can see in the image below:


Last, I applied the gloss:

The gloss is located in this compact underneath the eyeshadow. I used the light pink gloss because I have fair skin and did not want my lips to appear too dark. If you have darker skin you might prefer the darker gloss. The gloss is great because it adds shine and helps blend the lip liner and the lip stick!

You can find YBF cosmetics at HSN, Here's the link!

Also, If you would like to see exactly how I applied these, you can check out the video from my youtube channel below:


I hope you enjoyed this post! Be sure to share it with all your friends on Facebook and Twitter! You can follow me on Twitter for more updates @ashNICOLEley! Don't forget to subscribe to my page and my channel! Happy Shopping XOXO!!

Saturday, January 1, 2011

How TO: Get a Flawless Look!! Bare Minerals!

Every woman desires a flawless face, but let's face it... nobody has perfect skin. We try every cream, moisturizer, gel, foundation, and powder that we can get our polished little hands on, but we never quite reach perfection. Well, for the past few months I have been using Bare Escentuals' Bare Minerals and I can tell you that my skin hasn't looked this great in a long time!

CHECK IT!

THE PRODUCTS:
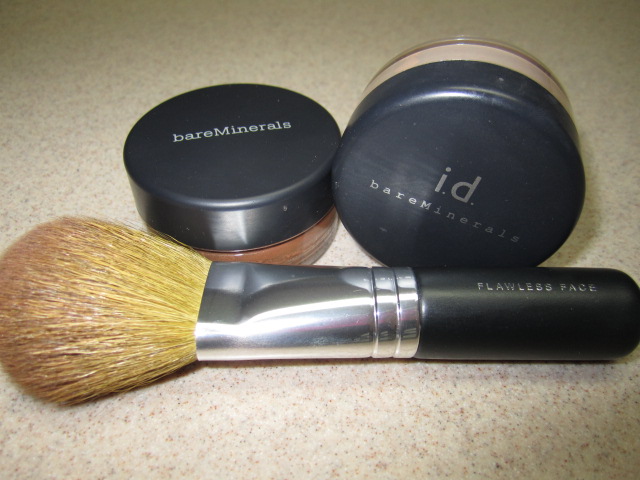
On the top I have my foundation. I use the matte version because I have somewhat oily skin and this really helps control shine. My color is medium. In the back in the left is the same foundation but in Medium Beige. This one is for when I am out in the sun and get a bit darker. I probably wont be using that one again until spring. In the back on the right is the mineral veil. This is used after the foundation and it fills the pores and lines and really finishes the look. In the front on the left is a product called warmth. This is lightly used all over the face to give a sun kissed look. I am not currently using it because I am too fair in the winter, I'm sure I will put it to good use this summer though. The product in the front on the right is Honey Bisque. I use this as a bronzer/blush.

THE TOOLS:
These are the brushes I use. They all came in a kit with some makeup to get started. It is a better deal to buy the kit instead of purchasing everything individually. It is somewhat expensive, but after you buy the kit and get started it is not that pricey to buy new tubs because the only ones you use a lot will be the foundation and veil. The bronzer/blush should last you a long time if used sparingly. Here's the link to the kits, I purchased the Customizable Get Started Kit!

FULL FLAWLESS FACE BRUSH:
This is the largest brush in the kit. It is used to apply the foundation and the mineral veil. I like to apply the foundation all over my face, then I use the max coverage brush to cover my problem areas. I then go back to the full coverage brush to apply the mineral veil. In the video, included in the kit, they tell you to apply the veil last, but I prefer to apply it before the bronzer/blush.

MAX COVERAGE BRUSH:
   
This brush is used for covering problem areas such as acne, redness, scars, etc. You use the same foundation that you applied all over with the Full Flawless Face Brush. This step can be done before or after application to the entire face, however I find it best to do this after.

FLAWLESS FACE BRUSH:
This brush is used for the bronzer/blush. It is smaller than the Full Flawless Face brush. When applying this I use a figure 3 shape sweeping over the temple, cheeks, and chin. I pay extra attention to the cheek application, applying this just below the cheekbone and upward toward the temple. I also include the apple of my cheeks in this application. This is the final step in my Flawless Face look!!!

CHEATER!!!
Ok, so... I cheat a little bit. I have always used a liquid foundation and I kinda feel naked without it. Before applying any of my Bare Minerals makeup I use my fingers to apply this all over my face and blend in to my neck. I chose Almay's Smart Shade Makeup because it is really light weight and blendable. The cost ranges between $11.97 and $12.54. I purchase mine at Walmart but I'm sure you could find it at any local drug store as well. Here's the link!

I'm doing something new today and including my first video. This video is somewhat long (I had to split it into two parts) but it shows exactly how I apply this makeup and achieve my look. I hope you find It useful! Be sure to share this with all your friends on Facebook and Twitter. You can follow me on Twitter @ashNICOLEley. Happy Shopping!! XOXO